Set up an out-of-band serial console connection from Raspberry Pi to VyOS over a null-modem USB cable with serial-getty@ttyUSB0.service and minicom and access via a Cloudflare zero trust tunnel to ttyd
- initial situation
It recently happened to me that my standard way of connecting into my home network (OpenConnect to VyOS) from remote stopped working suddenly (connection rejected). Also, local ssh connections to the VyOS router/firewall were rejected. I have not been able to determine the actual root cause yet, but a reboot of the machine “fixed” the problem (which required physical access to the machine). I assume that console access (via KVM or one of the USB ports used as a serial console) would still have been possible, but I did not check that. I am sure, however, that NAT routing/firewalling was still functioning in VyOS, as all internal machines were still connected to the internet via my ISP.
- contingency plan
In order to have an alternative access path to the VyOS router/firewall other than via OpenConnect VPN (and not requiring physical access in case the above problem happens again), I am implementing the following contingency plan:
- connect another host in my internal network (e.g. one of my Raspberry Pi machines) to the VyOS router/firewall via a USB/serial converter cable
- configure the USB port on the VyOS side as a serial console (listening/prompting for login)
- configure the USB port on the Raspberry Pi side as a serial terminal (e.g using the Linux tools minicom or screen)
- make the Raspberry Pi ssh access available via the internet using a combination of ttyd and a Cloudflare zero trust tunnel
- connect Raspberry Pi to VyOS via USB/serial converter cable
Both my Raspberry Pi 5 and my VyOS box (Asrock DeskMeet X600) do not have classic RS232 serial ports, so I need to get by with USB. Working with two USB-to-serial converters, DB9-to-DB25 adapters, gender changers, and a null-modem adapter, you would have to assemble an atrocious contraption like this:

However, these days there are specialized USB cables available that conveniently combine 2 FTDI FT232R serial/USB converters in one package (e.g. https://de.aliexpress.com/item/32996168545.html), greatly simplifying the USB-to-serial-to-USB conversion mess of using individual converter components:


Luckily, the FTDI FT232R driver is included in the Linux kernels used on both sides (Raspberry Pi 5 Raspbian/Debian 12 Bookworm kernel 6.6.31+rpt-rpi-2712 and VyOS 2025.04.26-0018-rolling kernel 6.6.87-vyos), so the device will automatically be detected. When plugging it in, a new device /dev/ttyUSBn will show up on both sides (in my case /dev/ttyUSB0, as it was was the first serial USB device plugged in on either machine).
- configure the USB port on the VyOS side as a serial console (listening/prompting for login)
myadmin@vyos01:~$ sudo systemctl start serial-getty@ttyUSB0.service
myadmin@vyos01:~$ sudo systemctl status serial-getty@ttyUSB0.service
 ● [serial-getty@ttyUSB0.service](mailto:serial-getty@ttyUSB0.service) - Serial Getty on ttyUSB0
      Loaded: loaded (/lib/systemd/system/serial-getty@.service; disabled; preset: enabled)
     Drop-In: /etc/systemd/system/serial-getty@.service.d
              └─aftervyos.conf
      Active: active (running) since Fri 2025-10-24 09:56:09 UTC; 2s ago
        Docs: man:agetty(8)
              man:systemd-getty-generator(8)
              [https://0pointer.de/blog/projects/serial-console.html](https://0pointer.de/blog/projects/serial-console.html)
     Process: 357718 ExecStartPre=/usr/libexec/vyos/init/vyos-config SERIAL (code=exited, status=0/SUCCESS)
    Main PID: 357720 (agetty)
       Tasks: 1 (limit: 74247)
      Memory: 200.0K
         CPU: 4ms
      CGroup: /system.slice/system-serial\[x2dgetty.slice/serial-getty@ttyUSB0.service](mailto:x2dgetty.slice/serial-getty@ttyUSB0.service)
              └─357720 /sbin/agetty -o "-p -- \\u" --keep-baud 115200,57600,38400,9600 - vt220

 Oct 24 09:56:09 vyos01 systemd[1]: Started [serial-getty@ttyUSB0.service](mailto:serial-getty@ttyUSB0.service) - Serial Getty on ttyUSB0.
According to the VyOS documentation (see https://docs.vyos.io/en/latest/configuration/system/console.html
and https://docs.vyos.io/en/latest/cli.html),
the “official” permanent solution for VyOS should be:
set system console device ttyUSB0 speed '115200'However, the actual syntax is apparently different:
myadmin@vyos01:~$ config
[edit]
myadmin@vyos01# set system console device usb0b1.2p1.0 speed 115200
[edit]
myadmin@vyos01# commit
[edit]
myadmin@vyos01# save
[edit]
myadmin@vyos01# exit
exit
The correct device specifier can be found by looking into /dev/serial/by-bus and checking for a link to the matching /dev/ttyUSB* entry:
myadmin@vyos01:~$ ls -l /dev/serial/by-bus/
total 0
lrwxrwxrwx 1 root root 13 Oct 23 19:13 usb0b1.2p1.0 -> ../../ttyUSB0
(note that the file names underneath /dev/serial/by-bus are matching the physical layout of the USB hardware, whereas the ttyUSB* pseudo-files underneath /dev are named dynamically according to the – possibly arbitrary – order of detection/insertion)
- configure the USB port on the Raspberry Pi side as a serial terminal (e.g using the Linux tools minicom or screen)
myuser@raspberrypi5:~ $ sudo minicom --device /dev/ttyUSB0
Note that in Minicom (connecting to the VyOS console) I always have to press <ctrl>-A Z and then send break………F to get a login prompt - I haven't found out why yet.
- make the Raspberry Pi ssh access available via ttyd web GUI
ttyd [options] <command> [<arguments...>]
Usage hints:
- use login for the command parameter to require the user to actually log in
- chose a custom port (option -p), default 7681
- option -W enables write access, else the user would not be able to enter any keystrokes (there seems to have been a change of defaults here in recent versions: the logic was inverted - previously there was a -R option to explicitly enforce a read-only session)
- to enable https, option -S (or --ssl) may be added (note that this doesn't matter much any more once the ttyd service is hidden behind a Cloudflare zero trust tunnel, as Cloudflare does the https termination)
Installation and test:
myuser@raspberrypi5:~/Downloads/ttyd $ wget -c https://github.com/tsl0922/ttyd/releases/download/1.7.7/ttyd.aarch64
myuser@raspberrypi5:~/Downloads/ttyd $ chmod +x ./ttyd.aarch64
myuser@raspberrypi5:~/Downloads/ttyd $ sudo ./ttyd.aarch64 -W login
(sudo is required when using ttyd with the login command to avoid a “cannot possibly work without effective root” error upon connecting from a web browser)
Addtional steps for securing via https:
myuser@raspberrypi5:~/Downloads/ttyd $ openssl genpkey -algorithm RSA -out /home/myuser/Downloads/ttyd/ttyd.key
myuser@raspberrypi5:~/Downloads/ttyd $ openssl req -new -key /home/myuser/Downloads/ttyd/ttyd.key -out /home/myuser/Downloads/ttyd/ttyd.csr
myuser@raspberrypi5:~/Downloads/ttyd $ openssl x509 -req -days 365 -in /home/myuser/Downloads/ttyd/ttyd.csr -signkey /home/myuser/Downloads/ttyd/ttyd.key -out /home/myuser/Downloads/ttyd/ttyd.crt
myuser@raspberrypi5:~/Downloads/ttyd $ sudo ./ttyd.aarch64 --ssl --ssl-cert /home/myuser/Downloads/ttyd/ttyd.crt --ssl-key /home/myuser/Downloads/ttyd/ttyd.key -W login
- publish the ttyd web GUI on the internet via a Cloudflare zero trust tunnel
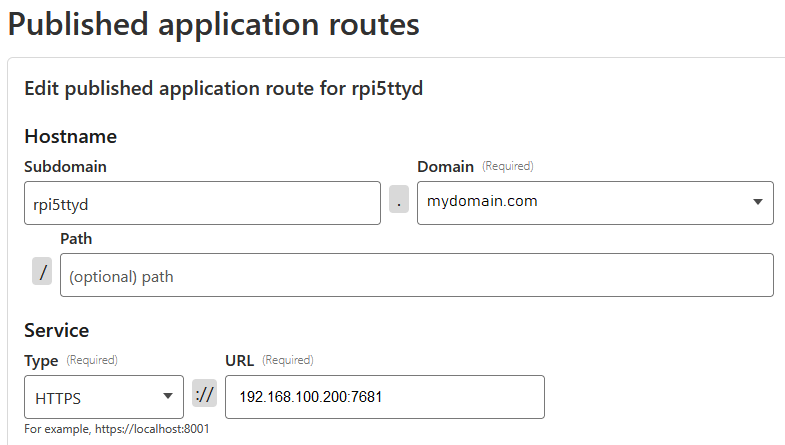
To make the ttyd web GUI created in the previous step accessible via Cloudflare zero trust tunnel with limited access (2FA protected), first create a new tunnel (for example named “rpi5ttyd”) in the Cloudflare Zero Trust dashboard -> Networks -> Tunnels, with the following settings for “Published application routes”:
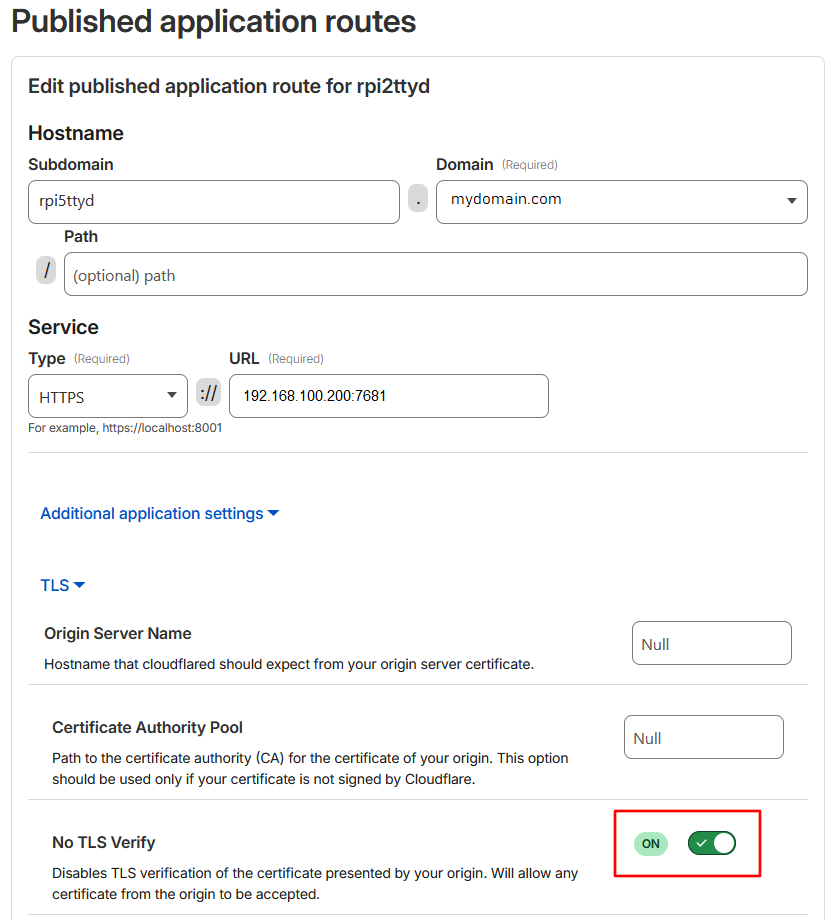
You may have to explicitly disable TLS verification if you don't want to bother with proper certificates on your local network (by default cloudflared will not accept improper certificates, resulting in HTTP 502 "Bad Gateway" errors):
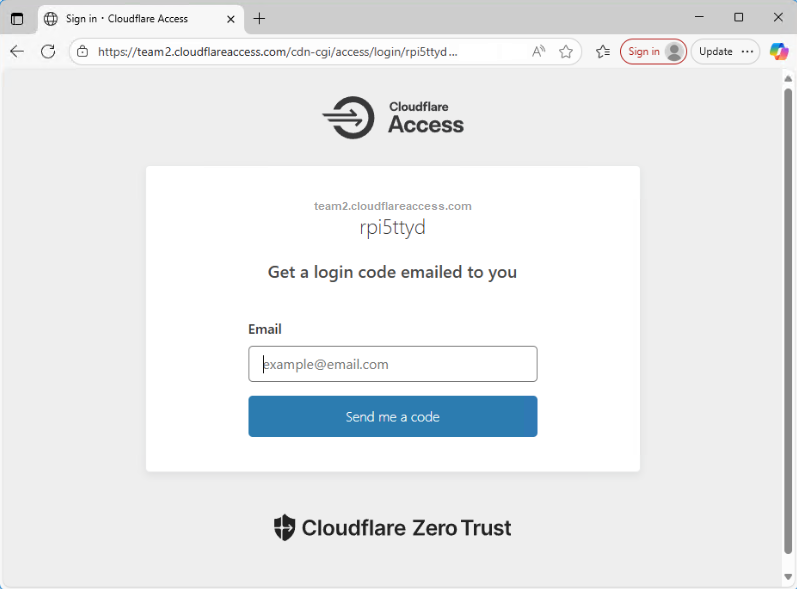
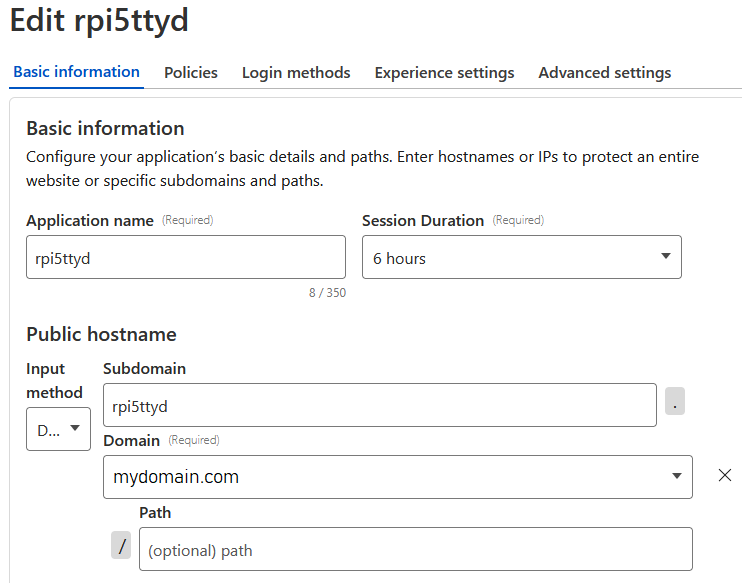
Then, in the Cloudflare Zero Trust dashboard -> Access -> Applications, create a new application also named “rpi5ttyd” with the following settings/policy (stick with the default login method “One-time PIN”:
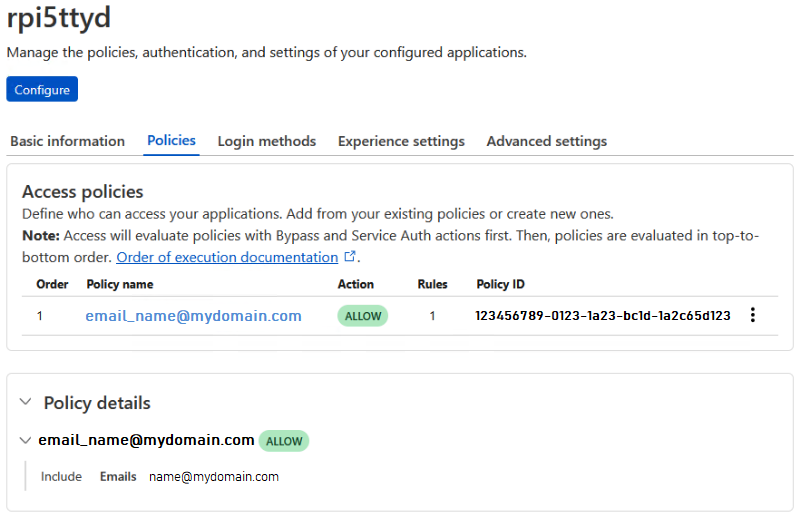
Note that this policy limits access to one email address which will
receive the one-time PIN via email to log in.
I haven't fully tested it yet, but it is my assumption that no emails
would be sent to other addresses (i.e. other login attempts are silently
ignored).
myuser@raspberrypi5:~/Downloads/ttyd $ sudo ./ttyd.aarch64 --ssl --ssl-cert /home/myuser/Downloads/ttyd/ttyd.crt --ssl-key /home/myuser/Downloads/ttyd/ttyd.key -W login… and start cloudflared on the Raspberry Pi host 192.168.100.200 with the token string provided in the Cloudflare Zero Trust dashboard for tunnel “rpi5ttyd”:
myuser@raspberrypi5:~ $ cloudflared tunnel run --token eyJhIjoi_...someToken..._TmpNMSJ9Note: instead of starting both programs interactively in the shell (not being available after a reboot), here's how to run both as systemd services (automatically started at boot time):
For cloudflared, a single command will take care of installing, enabling, and starting the systemd service:
myuser@raspberrypi5:~ $ sudo cloudflared service install eyJhIjoi_...someToken..._TmpNMSJ9
For ttyd, it is a bit more work. First, create the service specification file manually with the following content:
myuser@raspberrypi5:~/Downloads/ttyd $ cat /etc/systemd/system/ttyd.service
[Unit]
Description=TTYD
After=syslog.target
After=network.target

[Service]
ExecStart=/home/myuser/Downloads/ttyd/ttyd.aarch64 -t enableZmodem=true --ssl --ssl-cert /home/myuser/Downloads/ttyd/ttyd.crt --ssl-key /home/myuser/Downloads/ttyd/ttyd.key -W login
Type=simple
Restart=always
User=root
Group=root

[Install]
WantedBy=multi-user.target
Then, start and enable the systemd service as follows:
myuser@raspberrypi5:~/Downloads/ttyd $ sudo systemctl start ttyd
myuser@raspberrypi5:~/Downloads/ttyd $ sudo systemctl enable ttyd
With all of the above in place, it is now possible to connect to the ttyd web GUI from anywhere on the internet using the public URL https://rpi5ttyd.mydomain.com